Archive for the 'About ItsAPundit' Category

Issues with stats

Sunday, July 22nd, 2007 by Basil

We recently upgraded the software here at ItsAPundit. We're now running WordPress MU 1.2.3.

And it broke some stuff.

For example, the StatCounter plugin and the StatCounter Widget no longer work. We're not sure why, but we're investigating.

We also lost the Site Meter Widget. The good news is the Site Meter standard plugin still works.

We're not yet taking down the tutorials on using Site Meter or StatCounter with your ItsAPundit blogs, because we hope to have them working again soon.

But we have added the WP-Stats plugin and widget. It doesn't quite replace the functionality of StatCounter or Site Meter, but it does offer some functionality.

Tutorial: Using StatCounter

Wednesday, March 7th, 2007 by Basil

What is StatCounter?

StatCounter is another free, fast, and easy way to add a web counter to your web page. It also keeps statistics on the number of visitors, including the visits each hour, each day, the pages visited, where they came from, and more.

A lot of bloggers like and use StatCounter. So we've added a plugin to allow you use it as a Widget in your sidebar.

But first, to use StatCounter on your ItsAPundit.com blog, you have to have a StatCounter account. They're free. They also have premium accounts that cost money, but return more information.

To sign up for a free StatCounter account, go here open in new window.

Once you've signed up for your StatCounter account, you'll be provided with your StatCounter code. You won't be able to use the code as provided, but you'll be able to use parts of it to get a working StatCounter.

One other thing. The current version of the StatCounter Widget doesn't support invisible (or hidden) counter. It displays a StatCounter button. The counter works and you can view your stats by logging on to StatCounter. Yes, we plan to improve the Widget to offer better customization to your StatCounter.

I Got My StatCounter Code. Now What?

ItsAPundit supports StatCounter support via Widgets only. That means you can place your StatCounter in your sidebar. It's not that hard to do.
From your ItsAPundit Dashboard, click Plugins.

Scroll down to the StatCounter Widget plug-in. Click Activate.

Now, click Presentation > Sidebar Widgets.

Drag the items you want in your sidebar from the Available Widgets box to your Sidebar box. Note that some themes have more than one Sidebar box. Drag the Widgets to the appropriate box. Be sure to include your StatCounter Widget in the appropriate Sidebar box.

On the right-hand side of the StatCounter Widget, you'll see an icon. Click it.

The StatCounter Widgets Options box will pop up.

In the Title box, either enter a title for the Widget. One is not needed, but you can enter one if you wish.

Remember we said you'd not be able to use the StatCounter code as they provided, but you'd be able to use pieces of it? Here's where you'll do that.

In the sc_project box, enter the numbers following the "equals" sign in the StatCounter code you were given. For example, if your code included "sc_project=1234567" then you'd enter "1234567" (without the quotation marks, of course).

In the sc_partition box, enter the numbers following the "equals" sign in the StatCounter code you were given. For example, if your code included "sc_partition=11" then you'd enter "11" (without the quotation marks, of course).

In the sc_security box, enter the numbers following the "equals" sign in the StatCounter code you were given. For example, if your code included "sc_security=a123bcd4" then you'd enter "a123bcd4" (without the quotation marks, of course).

Click Update Options. The popup box will close.

Click Save Changes.

Open a new tab/window to your blog.

You should see your StatCounter in the sidebar. If you don't, one of two things has happened.

Either:

  1. You entered one or more of the values incorrectly. Recheck all of them against your StatCounter code.
  2. There is a problem with the Widget. Now, since we wrote the Widget, we'd be the ones to fix it. If you have entered the values correctly in your StatCounter Widget and it still doesn't work correctly, let us know.

Suppose I lost my StatCounter code

If you lose your code before you enter the values in the Widget, log on to your StatCounter account, click the Project Name, then click the "Install Code And Customise Project Settings" icon.

Complete the wizard and you'll see the standard StatCounter code. You'll be able to use the critical values in the Widget to enable your StatCounter.

Spammers

Monday, February 19th, 2007 by Basil

I knew this day would come. It actually came earlier this week.

Spammers.

I hate spammers.

Oh, I like SPAM. That meat product from Hormel. Good stuff.

But spam … unsolicited commercial email … is a pain. And, around here, we expand "spam" to include TrackBack and Comment Spam.
Lots of spammers set up Web sites to support their spam. And some have chosen to use this blogging service.

We're not here for that. I don't like it. And blogs set up here for the purpose of supporting email, comment, or TrackBack spam won't last long.

I've already closed down several. And see several more that look like spammers in training. They haven't yet put spam-consistent content on those blogs. But I expect they will. And I think they've tried, but have been caught by the JavaScript stripping that WPMU does. I think they'll keep trying, and eventually put up stuff that's obviously for spam purposes. And when they do, and when I see it, the blogs are toasts.

Sure, they may end up signing up for another blog. But I'll shut those down, too.

No, this isn't a challenge. Just a statement of fact.

I haven't gone so far as to contact their ISPs. But that's an idea.

Still, this is a blogging service. And I fully expect people to set up blogs that I find distasteful or offensive.

But I'm not going to tolerate some things. Spam isn't free speech. Nothing commercial is free.

I'm all about folks setting up blogs to make money. By selling ads or such. Not by spamming folks via email, TrackBacks, or comments.

Just thought you should know.

Tutorial: Using Site Meter

Friday, February 16th, 2007 by Basil

What is Site Meter?

Site Meter is a free, fast, and easy way to add a web counter to your web page. Not only does it display the number of visitors to your web site, it also keeps statistics on the number of visits each hour and each day.

At least, that's what they say. And we agree. We like Site Meter. A lot. And so do many others.

But first, to use Site Meter on your ItsAPundit.com blog, you have to have a Site Meter account. They're free. They also have premium accounts that cost money, but return more information. We have a premium account. But a free account still has lots of good stuff.

To sign up for a free Site Meter account, go here open in new window. To sign up for a premium Site Meter account, go here open in new window.

Once you've signed up for your Site Meter account, you'll be provided with your Site Meter ID (also called your "Site Code" or "Codename").

I Got My Site Meter Account. Now What?

ItsAPundit supports three ways of using Site Meter.

One way is via your Blogroll. This is not the preferred way, because it doesn't support many Site Meter features. That means you won't be able to track the original URL from which your visitors came before linking to your site. Other things that Site Meter won't be able to track about your visitors include timezones, keywords, search engines used, screen resolution, screen depth or javascript version. * open in new window.

Using the Site Meter Plug-in

David Smith, the genius behind Site Meter, developed a WordPress plug-in that we have available on ItsAPundit.

First, you must have a Site Meter account. See above. You'll be using your Codename / Site Code, so have that handy.

Next, you need to activate the Plug-in.

From your ItsAPundit Dashboard, click Plugins.

Scroll down to the Site Meter plug-in. Not the Site Meter Widget plug-in. (We'll cover that one in a minute.)

Click Activate.

Now, click Options > Site Meter.

Remember we said you'd need your Codename? Enter that in the codename box.

Click Update Options.

Open a new tab/window to your blog.

You should see your Site Meter at the bottom of the page. If you don't, it means one of three things have happened.

Either:

  1. Everything's fine and you have a premium account and have chosen the Invisible Tracker option.If you have a free account, this isn't what's happening and everything is not fine.
  2. or… You entered your Codename incorrectly.Recheck it against your Site Meter "welcome" email. If you entered it correctly, this is not what's happening. And the fault is likely mine. Because …
  3. The theme has an error and I need to fix it. Just let me know about the problem.

But, if everything is right, you'll see your Site Meter at the bottom of your blog.

Using the Site Meter Widget

If you want your Site Meter to appear in your sidebar, you need to use the Site Meter Widget.

From your ItsAPundit Dashboard, click Plugins.

Scroll down to the Site Meter Widget plug-in. Not the standard Site Meter plug-in.

Click Activate.

Now, click Presentation > Sidebar Widgets.

Drag the items you want in your sidebar from the Available Widgets box to your Sidebar box. Note that some themes have more than one Sidebar box. Drag the Widgets to the appropriate box. Be sure to include your SiteMeter Widget in the appropriate Sidebar box.

On the right-hand side of the SiteMeter Widget, you'll see an icon. Click it.

The SiteMeter Widgets Options box will pop up.

In the Title box, either enter a title for the Widget. One is not needed, but you can enter one if you wish.

In the Enter your codename box, enter your Site Meter Codename. This is requried.

Click Update Options. The popup box will close.

Click Save Changes.

Open a new tab/window to your blog.

You should see your Site Meter In the sidebar. If you don't see it, one of two things has happened.

Either:

  1. Everything's fine and you have a premium account and have chosen the Invisible Tracker option.If you have a free account, this isn't what's happening and everything is not fine.
  2. or… You entered your Codename incorrectly.Recheck it against your Site Meter "welcome" email.

If you suspect neither is the case, let me know. But it's probably one of these. So do double-check.

Can I Use Both?

If you activate both the Site Meter plugin and the Site Meter Widget plug-in, will it work?

Actually, yes. Our testing reveales that only one will show, so your stats should be correct. If, however, updates happen to either plug-in, they might start interferring with each other if they are both active. So we suggest activating one or the other, not both.
Inline TrackBacks

Wednesday, February 14th, 2007 by Basil

We've added another new plug-in to ItsAPundit.com - a variation of the classic Inline Trackbacks by Simply Kimberly.

While it's true that Kimberly Emerson is no longer supporting her plug-in, the value of the plug-in has been proven over time to those that like the Inline TrackBacks feature. We're supporting it here … but only for here.

Here's how it works.

When the plug-in is activated, TrackBacks and Pingbacks to posts will appear on the blog's home page, underneath the post. Some bloggers enjoy showing links to posts on the blog's home page. Some use it to host Linkfests.

Linkfests are not classical blogging, but they are popular in some corners of the Blogosphere. If Linkfests … or Inline TrackBacks … are your cup of tea, you can include them as part of your ItsAPundit.com blog.

While not everyone will use this plug-in, some will want to use it. And things like this are ways we're trying to make blogging just a little bit easier.

Getting Started … Fast!

Sunday, February 4th, 2007 by Basil

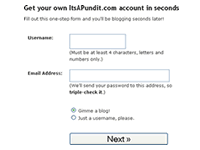
Getting StartedIt's easy … and fast … to get your free ItsAPundit blog.

How easy? Just click “Create a new blog” and then fill out the form.

See? Told you it was easy.

You will need to consider a couple of things when you start.

Your Username

Your Username will be both your login name and your blog’s URL. That is, if you choose imapundit as your Username, you’ll log in using imapundit and your password, and your blog’s URL will be http://imapundit.itsapundit.com/

Your Username is important. You won't be able to change it … or your URL. But you can change your Nickname.

For example, if your Username is imapundit, you'll log in with imapundit and your URL will be http://imapundit.itsapundit.com. But your Nickname can be anything you want. It can be Ima Pundit, I'm A Pundit, Alan Smithee, or anything you want.

Email Address

You’ll have to give an Email Address so we can send you verification link and your initial password. And don’t worry. We won’t send you emails or give your Email Address to anyone. We hate spam, and figure you do, too.

After you submit your information, ItsAPundit will send you a verification link to the Email Address you provided.

You'll have day to click the link.

Once you click the verification link, your blog will be created, and ItsAPundit will send you your ID and Password.

When you get that, log in and start blogging.

And if you want to change your Nickname or Email Address, you can.

See how easy this is?

Technorati Tags

Thursday, February 1st, 2007 by Basil

You can easily add Technorati tags to your posts at ItsAPundit.

"How?" you ask.

No, really. Go ahead and ask. I'll wait.

Well, since you asked…

We've implemented the Broobles SimpleTags plugin. Just activate the plugin from the Plugins page if you wish to use it.

Here are the instructions, from the Broobles SimpleTags plugin page.

Usage

The main way of using SimpleTags is to add a comma separated list of words or phrases within the [tags] tags at the end of the post. For example:

[tags]Word Press, Technorati, SimpleTags[/tags]

That's it. Whenever someone is viewing the post, either on the web or via RSS/Atom, the words you marked will be expanded to Technorati tags.

However, SimpleTags also allow you to tag words within your post. To tag a word/phrase, enclose it within [tag] (note that this tag doesn't have an "s" at the end!). Words which are marked in this way will appear in the list of tags at the bottom of the post. You can also combine these two methods, by tagging some words in the post with [tag] and providing a list of additional tags at the end of the post with [tags].

Example

Here is an example which uses both in-post tags and a list of tags at the bottom of the post. This is how you would write it:

This post demonstrates how [tag]SimpleTags[/tag] work. All the words that are enclosed withing 'tags' will be added to the bottom list of [tag]Technorati[/tag] tags at the bottom of the post. We can also provide a list of additional words/phrases that we want tagged, like the one above.

[tags]WordPress, WordPress Plugin[/tags]

This post would look like this when viewed:

This post demonstrates how SimpleTags work. All the words that are enclosed withing 'tags' will be added to the list of Technorati tags at the bottom of the post. We can also provide a list of additional words/phrases that we want tagged, like the one below.

Technorati Tags: , , ,

For live examples, visit the Broobles blog.

Just another way we're trying to make blogging easy.

ItsAPundit. And so are you.

Sunday, January 28th, 2007 by Basil

ItsAPundit began as an April Fools Day joke in 2005.

After the funny wore off, ItsAPundit remained as an alternative outlet for some bloggers.

ItsAPundit is still all that. But now it's also something else.

ItsAPundit is now a blogging platform.

That means you can get your own ItsAPundit.com blog. For free. Just sign up and start blogging. Or punditing. Whatever.

We got yer extras right here!

ItsAPundit.com runs on the WordPress MU software. Just like WordPress.com … and some other enterprise blog platforms.

But many of those platforms have restrictions. And so do we. It's just part of the WordPress MU software.

But we have removed some of the restrictions.

For instance?

Ads.

Yep, you can sell ads on your ItsAPundit.com blog. And we don't get a cut. It's all yours.

For example, if you want Google AdSense on your blog, just use the Google AdSense widget. Same thing for BlogAds; just use the widget.

And, if you're an affiliate with a service that offers HTML ad code, you can use the Text Widgets, or the Ad Rotator Widgets. Those are perfect for Amazon.com ads, among others.

Give us a shot

Go ahead and sign up for a free blog. It's quick. And free.